
FCM enables Teliver SDK to efficiently manage and function the application procedures. The sturdiness of the SDK is controlled by the Server, which in return provides greater real time accuracy and better Battery management. It additionally also helps in recovery of application crashes.
If FCM has already been setup:
The below steps will include the setup of Firebase project for your mobile app, and add the google-services configuration file to your codebase. These steps could be skipped if in case FCM integration has already been set-up in your mobile application.
API project – Creation:
A Firebase project is essential in order for Cloud Messaging Projects to function. Hence, configuration file and credentials for your project would be generated in this process.
1) Initially create a new project in firebase console. For Apps with existing firebase project a new one need not be created. If your Google Project is associated with your mobile app, the existing could be selected from the ‘Import Google Project’ button available.

2) From the displayed screen – click on ‘Add firebase to your android app’ and proceed further with the setup steps. If an existing Google project is being imported, you could download the config file without going through the setup.
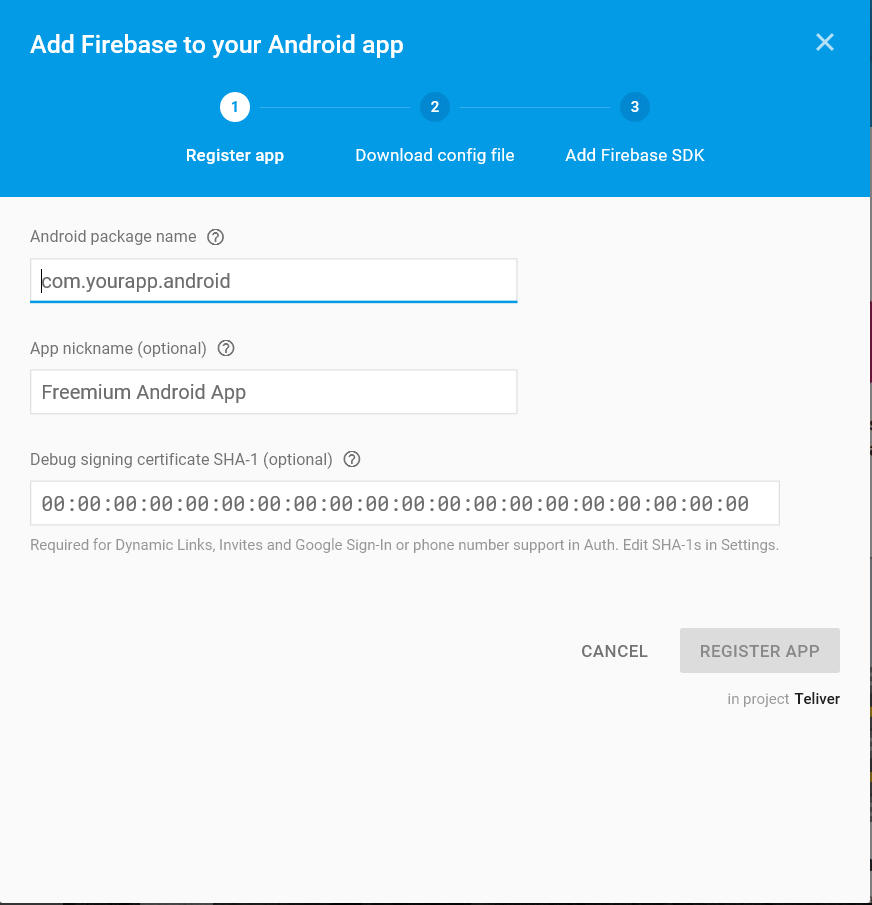
3) When provoked, app’s package name has to be entered. Entering the package name of your app which is in use is crucial; this can only be set when you add an app to your Firebase project.
4) Download the google-services.json file at the very end. The file is also available to download any time later on.
5) If you haven’t done so already, copy this into your project’s module folder, typically app/.
Add the configuration file to your project:
The Google Services plugin for Gradle parses configuration information from the google-services.json file. Add the plugin to your project by updating your top-level build.gradle and your app-level build.gradle files as follows:
1) Add the dependency to your project-level build.gradle:
buildscript {

...

dependencies {

...

classpath 'com.google.gms:google-services:3.0.0'

}

}
2) Add the plugin to bottom your app-level build.gradle:
apply plugin: 'com.google.gms.google-services'
Where is the FCM key?
FCM key can be located in your Firebase Console under Project settings > Cloud Messaging.

Adding FCM key in Teliver Dashboard:
Step 1:
Login to your Teliver Dashboard
Step 2:
Under the integrations tab provided click on ‘Add Android’s SDK on your Application’
Step 3:
Enter the ‘Teliver Key’ and ‘Package Name’ if the basic integration has not already configured. Click on ‘Save’.
If the basic integration has been previously done, head over and click on the ‘Save’ button.
Step 4:
The now visible page guides you through the basic SDK integration steps. If previously done proceed further by clicking on ‘Confirm Integration’ at the end of the page.
For users who are in the process of integrating the SDK for the first time, follow the steps as mentioned and finally head over to the end of the page and click on ‘Confirm Integration’.
Step 5:
The subsequent page will display a set of fields for Push Notifications and Android Security. Under the section Push Integration, a blank field to paste your FCM Key is given. Do the needful and click on Save.
 You are now finally set to go.